Posts

Showing posts from October, 2016

Java Beginner: Lesson 9 - switch

Image
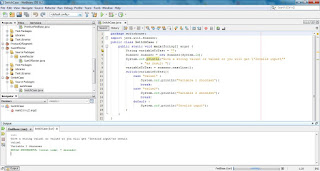
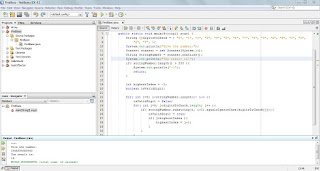
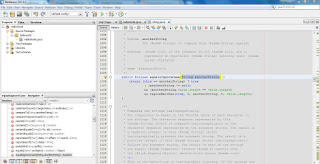
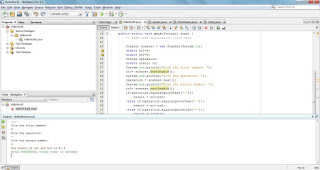
In this lesson we will cover the switch statement. The switch statement same as if statement is a conditional statement, so it checks if a condition is fullfilled, but differently from if statement it is used for a well known set of values and for specific variables. If statement can be used to test complex conditions which can involve even more than one variable, while the switch statement is used to check the value of a specific variable. Example code: switch(variableToTest){ case "value1" : System.out.println("Variable 1 choonsen"); break; case "value2": System.out.println("Variable 2 choonsen"); break; default : System.out.println("Invalid input"); } The example code above shows the structure of a switch statement in case we would test a string variable. So if the string variable with name

Exercise Beginner: Base of the number

Image
Request: You are given a string (less than 255 characters). Write a program that determines whether the given string is a number in some number system with a base not more than 16, and, if so, determine the base of the number system, otherwise print -1. Solution First we declare an array of strings which will hold all the possible values of digits that system numbers with base till 16 can have. Than we get the number to be analyzed from user. Being that in the request we have that the given string must not have more than 255 characters this is the first controll tha we make, if the string is larger than 255 characters we print the value -1, which means that we do not have a valid input and we return by ending the method execution. We declare an integer variable highestIndex intialized with the value -1 and a boolean variable isValidDigit. The highestIndex variable will store the value of the biggest valid base for the digits of the string taken in input, and the boolean variable isV

Exercise Beginner: Product of numbers

Image
Request: Find the product in a segment of numbers when there is given the beginning of the segment and the ending of the segment. Solution This exercise can have different solutions, in this case we will show the one by using the for loop. If you are not familiar with the for loop follow the lesson 7 first. One possible solution of this problem is shown in the example code bellow: Example code: import java.util.Scanner; public class ProductOfSegment { public static void main(String[] args) { System.out.println("Give the starting number of the segment"); Scanner scanner = new Scanner(System.in); int firstNumber = scanner.nextInt(); System.out.println("Give the ending number of the segment"); int lastNumber = scanner.nextInt(); int product = 1; for( int i= firstNumber; i<=lastNumber; i++){ product = product *i; } System.out.println("The product

Java Beginner: Lesson 8

Image
Array After haveing some knowledges about data types, if condition and loops we will see arrays in this lesson. We will abandon the HelloWorld application that we have used previously and we will create a new one. If you need help on how to create a new project refresh your memory from lesson 1 . I will name the project on this lesson Array, you can name it whatever you would like to. Being that we have seen loops in previous lessons we will make a simple iteration into an array and edit some elements of the array. Array in java is a data structure which can hold inside it elements of the type which we declare that it can hold. For example, we will have a data structure which can hold integers if we declare an array as shown in the example bellow: Example code: int myArray[]; But how many elements can this data structure hold? We have not determined it yet because we have just declared the array and not initialized or instantiated it. There are different ways to give a value

Java Beginner: Lesson 7

Image
for loop After showing the while and do while loops in the previous lessons we will see the for loop in this lesson. We will see 2 types of implementation of the for loop in this lesson. The first way to implement the for loop, an unusual one, is the one shown bellow, editing the code of the previous lessons to replace do while with for to keep the same functionality we get: Example code: // TODO code application logic here Scanner scanner = new Scanner(System.in); double nr1=0; double nr2=0; String operation; double result =0; for( ; true ; ){ System.out.println("**********NEW OPERATION*********"); System.out.println("Give the first number: "); nr1= scanner.nextDouble(); System.out.println("Give the operation: "); operation = scanner.next(); System.out.println("Give the second number: ");

Java Beginner: Lesson 6

Image
do while loop Same as the while loop, shown in the lesson 5 , there are other loops which make possible to repeat an action or a set of actions. In this lesson we will cover the do while loop. In the main method which in the previous lesson was as follow: Example code: public static void main(String[] args) { // TODO code application logic here Scanner scanner = new Scanner(System.in); double nr1=0; double nr2=0; String operation; double result =0; while( true ){ System.out.println("**********NEW OPERATION*********"); System.out.println("Give the first number: "); nr1= scanner.nextDouble(); System.out.println("Give the operation: "); operation = scanner.next(); System.out.println("Give the second number: "); nr2= scanner.nextDouble(); if(operation.equalsIgnoreCase("+"

Java Beginner: Lesson 5

Image
while loop In order to repeat a certain action or set of actions like in most programming languages even in Java there are loops that make possible such an action. In this lesson we will see the while loop. In this lesson we will continue customizing our hello world application with which we have worked in the previouse lessons we will add a while loop into it. This loop will help us repeat operation and not exit the application after the first operation. The state of the main method before we add the for loop is as shown bellow. Example code: public static void main(String[] args) { // TODO code application logic here Scanner scanner = new Scanner(System.in); double nr1=0; double nr2=0; String operation; double result =0; System.out.println("Give the first number: "); nr1= scanner.nextDouble(); System.out.println("Give the operation: "); operation = sca

VOIP Project: Database implementation - Part 3

After creating the database model as shown in the previos post VOIP Project: Database modeling - Part 2 , we will cover the implementation of that model in this part. On this project will be used a MySQL database. During this lesson we will demostrate the implementation on a MySQL database, which you can obtain by following the lesson Installing MySQL database , or you can create an account at db4free.net in order to have a MySQL database online. First step after logging into the phpMyAdmin management site, as shown in VOIP Project: Database modeling - Part 2 , will be the creation of the database. In the databases tab in the menu of the phpMyAdmin management site is selected the name of the database. During the development of the project the name of the database is set to voip_school_network . After the database is created, the next step that follows is the creation of the tables. As seen in figure 1 of the lesson VOIP Project: Database modeling - Part 2 , in order to supply all

Installing MySQL database

Image
In this lesson we will cover the installation of wamp server on an windows PC, which will install a MySQL database engine as well, and we will focus on the MySQL database. In order to download the wamp server go to http://www.wampserver.com/ , click the download button as shown in the figure 1. Figure 1: Download wamp server In the download session click the appropriate version for your machine. On the window that pops up click the link marked with number one in order to download the Visual Studio 2012 VC 11 vcredist_x64/86.exe file if you don't have it and than after installing that file click the link marked with number two shown in the figure 2 to download the wamp server. Figure 2: Wamp server download steps After download process has finished install the wamp server normally like every other program and give permission to pass traffic through firewall. After completing the installation of wamp server run it and wait for the wamp icon in the taskbar to become green

C++ Beginner: Lesson 1 - Hello World application

Image
Like every other programming language lesson series we will start with the "Hello World" application just to get a little bit familiar with the environment. After downloading the Qt Creator as shown in the lesson 0 and installing it, in order to create a new project you need to click on File->New File or Project, or you can click directly on the New Project button on the welcome screen of the Qt Creator as shown in the figure 1. Figure 1: Create new project After following the step above, in the New Project window, in the Projects session we choose Application and middle session we choose Qt Widgets Application as shown in the figure 2. Figure 2: Qt Widgets Application In the next window, Qt Widgets Application, we determine the name of the project and the location where it will be created. Figure 3: Name and location of the project After we click next, we reach the "Kits" window. Regarding the "Kits" in the Qt Creator we will talk later

VOIP Project: Database modeling - Part 2

Image
As mentioned in the part 1 of this project, the system which is created during this project contains 3 main components and one of them is the database. In this part we will cover the design of the database. For creation of Entity-Relationship Diagram(ERD) of the database of the system is used the community edition of visual paradigm application. Below, in the figure 1, is show the diagram of the database used by the system. As shown in the picture in consists in 6 tables: cit_classroom, cit_subject, cit_scheudle, cit_sip_account, cit_consultation, cit_user . The table cit_classroom as described by its name, contains information about the classroom, labs and lesson classrooms. It has 2 columns, Id , which is of type varchar(10) and contains the name of the classroom, for example: lab2 or D3 , which is unique and is this case is used as primary key. The next column is the Capacity , of type int(11), in which is stored information of the number of the students that the classroom

VOIP Project: Introduction - Part 1

Image
This project covers the development of a VOIP(Voice Over IP) system costumized for a university institution. This project is developed using Qt creator, C++ language. If you do not have installed Qt creator on your computer you can follow the lesson 1 in order to obtain it. In this project will be covered the Ubuntu version as well. This project will cover main software engineering steps. The system which was developed during this project contains 3 main components, as shown in the picture bellow. Figure 1: Overview of the system PBX is hosted in bitrix24.com, a free PBX hosting domain. In this PBX is possible to manage the users of the VOIP service. The other component, MySQL database, is an online database in which is stored information for the extra features of the system, like the schedule organization of lessons, consultation or projects. This database is hosted in an online server, which allows the system to be used outside extranet. The database must contain the same in

Java Beginner: Lesson 4

Image
If condition In order to take decisions in java we use the if condition. The if condition can be applied on boolean expressions only, so we can ask if an expression is true or false. In the previos lesson, lesson 3 , the if condition is used several times in order to determine which operation the user has given as input: Example code: if(operation.equalsIgnoreCase("+")){ result = nr1+nr2; }else if(operation.equalsIgnoreCase("-")){ result = nr1-nr2; }else if(operation.equalsIgnoreCase("*")){ result = nr1*nr2; }else if(operation.equalsIgnoreCase("/")){ if(nr2!=0){ result = nr1/nr2; }else{ System.out.println("Can not devide by 0\n"); return; } } operation variable in the example code above is a String variable. In the string class is declared the public method equalsIgnoreCase(String anotherString) which is a method which returns a boolean value. In the NetBeans IDE if we keep pressed the CTRL key and pres the ri

C++ Beginner: Lesson 0 - Setup enviroment

Image
In order to be able to start programming we will need an IDE. For all the exaples of code Qt Creator IDE is used. For the complete beginners it is advisable to use the same tool, but if you are familiar enough with programming you are free to choose. It is easy to obtain Qt Creator community edition, which is the free version and the version we will use for the examples on this blog. From the website of Qt, qt.io , can be downloaded this IDE. By the time this post was written the Qt Creator community edition was available on this link: Qt Open Source . When you land on the download page it should detect automatically the operating system you are using as it seen in the figure 1 bellow: Figure 1: Qt Creator automatic OS detection If you don't like to download the recommended version by the Qt Creator website you can follow this link to download the desired version. In case you find difficulties to install the IDE please comment bellow and I would be happy to help. (please

Java Beginner: Lesson 3

Image
Arithmetical operations In this lesson we will se the arithmetical operations by creating a simple calculator. we will use the primitive data type double in order to have precision during division. In order to be abble to create the calculator we have to get input from user. We get get output from user for double variables through following line: scanner.nextDouble() Where scanner is an instance of Scanner class. For the operator we will use a String variable, but we can use char as well. In order to be able to retriev a string variable from user we writte the following line: scanner.next() After retrieving the 2 double variables and the operation sign we have to check the type of the operation through if condition statment. Also we can check for illegal operations as well, for example for division with 0 which I have implemented in the example. Bellow you will see the complete code of the example. Example code: /* * To change this license header, choose License H

Java Beginner: Lesson 2

Image
Introductions to data types In this lesson we will cover data types. Data types are devided into primitive and complex ones. Primitive data types are: boolean byte short char int long float double Complex data types are those data types for which you need to create a class in order to create instances of them, or you can use predefined classes, in the libraries for example, in order to create instances of this data types. String for example is a comples data type. Returning to the project created in the previous lesson, the main method within HelloWorld class inside the HelloWorld.java file has a String paramenter in it as seen in the figure 1 bellow: Figure 1: String parameter in the main method If we keep pressed the CTRL button and we click on the "String" word the IDE will open for us the String.java file which contains the implementatin of String class as seen in the figure 2 bellow: Figure 2: String.jav file containing the String class If we put the mo

Java Beginner: Lesson 0

Image
In order to be able to start programming we will need an IDE. For all the exaples of code NetBeans IDE is used. For the complete beginners it is advisable to use the same tool, but if you are familiar enough with programming you are free to choose. It is easy and free to obtain NetBeans IDE. From the website of NetBeans, netbeans.org , can be downloaded this IDE. By the time that this post was written the website had the view bellow: Figure 1: netbeans.org preview As it can be seen from the preview above, the last version of this IDE is 8.2 in the time that this post was written. In order to download the IDE, the yellow button with test "Download" on the right must be pessed. After pressing that button the following page will be shown: Figure 2: NetBeans download page From the page shown above, the Java SE download is selected by pressing the download button in the column "Java SE". After pressing the donwload button the download of the .exe file of the IDE

Java Beginner: Lesson 1

Image
Like every other programming language lesson series we will start with the "Hello World" application just to get a little bit familiar with the environment. First, in order to create a java application on NetBeans IDE, we need to click on the menu File->New Project... as shown in the figure 1 bellow: Figure 1: Create new project After this step the window which allows the selection of type of application will be shown as seen in the figure 2 bellow: Figure 2: Type of application We choose java application and click next. The final step before creating the project is the determination of the name of the project and location where the project will be stored as seen in the figure 3 bellow: Figure 3: Project name After completing the above steps the view shown bellow in the fiugre 4 will be seen: Figure 4: Project view In the created HelloWord.java file is auto generated the class with the same name "HelloWorld" and within this calss is generated the