Posts

Showing posts with the label beginner

Free host and domain

Image
In order to be able to have a website online are needed a server which is used to host the website and a domain which is linked with the IP of the server where is hosted the website. In order to get a host and a domain the programmers must pay, but at 000webhost.com can be taken free subdomain and host. At 000webhost.com after sign up must be confirmed the email address entered during sign up. Figure 1 shows an example of filling the information during the sign up that we'll use in this lesson. Figure 1: Sign up at 000webhost.com The information that are used in figure 1 must be replaced as required. First is the email, after email is the password field and the third input field is the field where is entered the name of the website and bellow is updated the domain of the website which will be created. After the creation of the account the email address must be confirmed. After confirming the email address, the created website is displayed as seen in figure 2 bellow. Fig...
Online MySQL database

Image
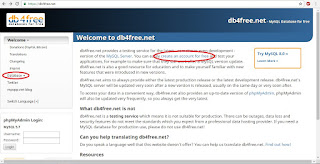
In order to build complete and fully functional applications sometimes we need databases to store and manipulate data, but we do not need to access them only from the LAN but even through the internet. In order to have an online database there are several ways like exposing a locally owned server to the internet or if you own a web host account they usually come with MySQL database which you can use for other purposes as well except storing the data of the website. Except this two ways there are some free online MySQL database providers as well. This is the what we will cover in this lesson, how to have a MySQL database online for free. This kind of database that we will see in this lesson are for experiments only because they are not reliable and they are slow. We will use the online database in upcoming lessons so we need to have one ready for those lessons. In order to have this free online database we need to go to db4free.net . After you go to the link mentioned previously, in t...

C++ Beginner: Lesson 4 - Tic Tac Toe game

Image
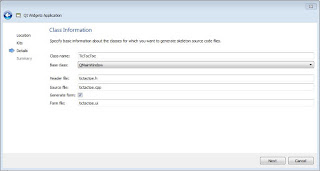
In this lesson we will cover if condition which we saw in the previous lesson as well, and we will cover the switch control statement too. Other elements that we will cover in this lesson are one and two dimensional arrays and we will see the for loop as well. During this lesson we will develop the tic tac toe game. In order to do so, we need to create a new project as we have seen in lesson 1 , but in this case we will call the application TicTacToe and the class will be named TicTacToe as well as shown in the figure 1. Figure 1: TicTacToe game The first step to create the TicTacToe application is to prepare the layout of the window. From the toolbox panel we take the Grid Layout element and drag it into window and than select the window and press the Lay Out in a Grid button as shown in the figure 2. Figure 2: Grid layout After the setup of the layout we start dragging and dropping into the window 9 QPushButton elements as shown in the figure 3 bellow. Figure 3: Add butt...

Exercise Beginner: Sort array(Bubble sort)

Image
Request: Write a program that inputs n natural numbers and a natural number k. Sort the input by non-descending order and then insert element k in such a way that the new resulted array is also sorted (1 ≤ n ≤ 1000, 1 ≤ numbers, k ≤ 1000000). Solution In order to be able to solve this exercise the programmer must know the concept of array which we have seen on lesson 8 , if condition which we have seen on lesson 4 and the for loop which we have seen on lesson 7 . So from the request we see that we must get from the user the k number. We can do this operation through the given code bellow: Example code: System.out.println("Gvie the k element:"); int k = scannInt.nextInt(); Where scannInt is an instance of Scanner class which is shipped within JDK and is found inside the java.util package, so in order to use it we need to add the line bellow in the beginning of the application if our class is not inside any package or directly bellow the package if the ...

C++ Beginner: Lesson 3 - Simple calculator

Image
After we got familiar with Qt Creator environment in the lesson 2 we will build a simple calculator in order to get familiar with some data types which come with Qt Creator framework like QString and other C++ primitive data types. First of all we need to create a new project as shown in the lesson 1 . During the creation, instead of mainwindow class we have used calculator class. After creating the project, in design view of qt creator we create the layout of our application. Initially we get a LineEdit element from the toolbox panel as shown in the figure 1. Figure 1: Add LineEdit on window After we add the line edit on window we fix the size according to our needs, in this case we fill the window horizontally by leaving some margin right and left. After we add the LineEdit element on window we need to add the buttons for the numbers and operations as well as shown in the figure 2. Figure 2: Add PushButton on window After we add the buttons as shown in the figure above we ...