In order to be able to continue developing further more the VOIP system we need to know which are the components that can be used to build a VOIP system and how they are implemented. In the book titled “Packet Guide to Voice over IP” VOIP is: “…exactly what the name indicates—sending voice (and video) over an IP-based network. This is completely different than the circuit-switched public telephone network…” ( Hartpence, 2013, p. 2). The fact that VOIP “…is completely different than the circuit-switched public tele‐ phone network…” ( Hartpence, 2013, p. 2)makes it possible to do things that are not possible with the standard telephony system, like programming customized applications based on individual needs. VOIP does not only allows to transmit voice over IP but video as well, and this makes communication through VOIP even richer in features. Comparison with traditional telephony VOIP gives the opportunity to use internet connection in order to implement system, while the trad...
After we got familiar with Qt Creator environment in the lesson 2 we will build a simple calculator in order to get familiar with some data types which come with Qt Creator framework like QString and other C++ primitive data types. First of all we need to create a new project as shown in the lesson 1 . During the creation, instead of mainwindow class we have used calculator class. After creating the project, in design view of qt creator we create the layout of our application. Initially we get a LineEdit element from the toolbox panel as shown in the figure 1. Figure 1: Add LineEdit on window After we add the line edit on window we fix the size according to our needs, in this case we fill the window horizontally by leaving some margin right and left. After we add the LineEdit element on window we need to add the buttons for the numbers and operations as well as shown in the figure 2. Figure 2: Add PushButton on window After we add the buttons as shown in the figure above we ...
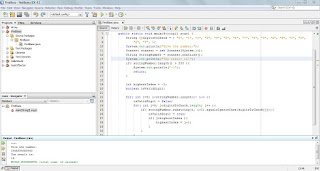
Request: You are given a string (less than 255 characters). Write a program that determines whether the given string is a number in some number system with a base not more than 16, and, if so, determine the base of the number system, otherwise print -1. Solution First we declare an array of strings which will hold all the possible values of digits that system numbers with base till 16 can have. Than we get the number to be analyzed from user. Being that in the request we have that the given string must not have more than 255 characters this is the first controll tha we make, if the string is larger than 255 characters we print the value -1, which means that we do not have a valid input and we return by ending the method execution. We declare an integer variable highestIndex intialized with the value -1 and a boolean variable isValidDigit. The highestIndex variable will store the value of the biggest valid base for the digits of the string taken in input, and the boolean variable isV...


Comments
Post a Comment