C++ Beginner: Lesson 3 - Simple calculator
After we got familiar with Qt Creator environment in the lesson 2 we will build a simple calculator in order to get familiar with some data types which come with Qt Creator framework like QString and other C++ primitive data types.
First of all we need to create a new project as shown in the lesson 1. During the creation, instead of mainwindow class we have used calculator class.
After creating the project, in design view of qt creator we create the layout of our application. Initially we get a LineEdit element from the toolbox panel as shown in the figure 1.

Figure 1: Add LineEdit on window
After we add the line edit on window we fix the size according to our needs, in this case we fill the window horizontally by leaving some margin right and left. After we add the LineEdit element on window we need to add the buttons for the numbers and operations as well as shown in the figure 2.

Figure 2: Add PushButton on window
After we add the buttons as shown in the figure above we need to change their text. In order to change the text of buttons we double click on them and change the text for every button as shown in the figure 3 bellow.

Figure 3: Change the text of buttons
This will be the final graphical layout that our application will have.
In many calculator sotware the text on the LineEdit element is shown on the right. By default the LineEdit component shows the text on the left. In order to change this property of LineEdit we need to select it and change the value of alignment property from AlignLeft to AlignRight as shown in the figure 4 bellow.
Figure 4: Change the text alignment of LineEdit
After we complete the above steps on the layout we can start working with the code. In order to add event on buttons we need to right-click on them and click on "Go to slot..." menu as shown in the figure 5.

Figure 5: PushButton context menu
After the "Go to slot..." is clicked the method shown in the figure 6 is generated. Qt Creator has a "signals and slots" architecture which we will discuss in the more advanced lessons.

Figure 6: Generated slot
The action of slot generation must be repeated for every button on window in order to have generated slots for every button. The Qt Creator generates the definition of slots in the header file calculator.h when it generates their implementations in the source file calculator.cpp. The slots definition in the header file is shown in the figure 7 bellow.

Figure 7: Slot's definitions
After we generate all the functions for the buttons on window we create a function called manageClick which is shown in the figure 8 bellow.

Figure 8: Definition of manageClick function.
The manageClick function will be used to implement the logic of the application when a number button is pressed. This function takes as parameter the text of the button, the complete logic of this method we will see when we will write its implementation in the source file calculator.cpp. Being that we are in the header calculator.h file we will define the variables which we will need in this class. This variables will be private, because we will need them only inside this class. They are shown in the figure 9 bellow.

Figure 9: Declaration and initialization of variables with default values
The ui variable is a variable generated by Qt Creator when the project is created, the other variables shown in the figure 9 are the variables which we need to define. This calculator that we are building is a simple calculator as I have mentioned before, so we will make operations only between two numbers and not more than two, so we will need two variables, one that will store the value of the first number an one that will store the value of the second number. We will store the value of the first number in the variable called firstNumber and the value of the second number in the variable called secondNumber. This variables will be both of type QString, whih is a data type defined in the libraries of Qt framework and stores a series of characters which in most of the languages are known simply as strings. The default value or this variables will be empty "" which means that the variable has not taken any value form the user in that state. The other QString variable shown in the figure 9 is the signPressed variable. This variable will be used to store the sign of the operation that will be made and it will get a value when the +,-,* or / are pressed. The last variable will be a boolean variable named secondNumberEntered which can take two values, true in case the secondNumber variable will have its value different from "" and true fi secondNumber variable will be equals to "". Based on this variable we will check the possibility to perform a given operation or not.
After we complete the definition of the variables shown above and have defined the manageClick function we need to proceed with the implementation of manageClick function in the source file calculator.cpp as shown in the figure 10.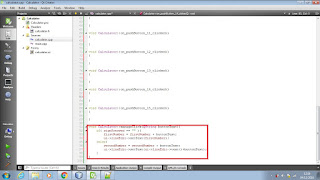
Figure 10: Implementation of manageClick function
In the body of this method we will have to add the value of the pressed button the the firstNumber or secondNumber variables and display the new digit on LineEdit together with the other digits pressed before. First of all we need to determine where to append the newly pressed digit. This decision we will take based on the value of the signPressed variable. If this variable has the default value "" that we mentioned above it means that there is not pressed any operation yet from the user, so we will append the new digit to the first variable, otherwise if the signPressed variable has a value assigned it means that we need to append the digits in the secondNumber variable. This logic is expressed in C++ code as shown in the figure 10 above. So as seen from the figure the structure that allows us to take a decision is the if statement. The structure of if statement is as shown bellow:
Example code:
So in our case if the expression signPressed == "" will evaluate to true the code inside the first set of curly brackets will be executed else the code inside the set of the curly brackets will be executed.
As mentioned while explaining the definition of signPressed variable we will assign to it a value when the +,-,* or / button are pressed and at the same time we will have to display this operations on the LineEdit element. In order to be able such thing we need to add in the slots of +,-,* and / buttons the code shown in the figure 11.

Figure 11: Manage operation's button click
In the case of this lesson the buttons of operations are named pushButton_11, pushButton_12, pushButton_13 and pushButton_14. In order to check which are the names of your operation buttons you can click on the button in the design view mode and check the value of objectName property in the properties panel as shown in the figure 12, you can change the name of buttons but you would have to generate again their slots in that case.
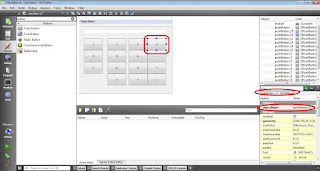
Figure 12: objectName property
After we manage the click event on operation buttons we have to manage the clicks on number buttons as well, in order to do so we call the manageClick function on all the slots of number buttons as shown in the figure 13.

Figure 13: Call of manageClick function in every number button slot
We call the manageClick function with the text value of every function as parameter. Until this point we are able to see the entered digits and operations in the LineEdit on window as seen in the figure 14.

Figure 14: Execution example, digits and operation sign shown
There is one more thing to be managed in the graphical part, we do not want that the user to enter directly text on the LineEdit element so we change the LineEdit's property readOnly to true by checking the checkbox as shown in the figure 15.
Figure 15: Set readOnly property of LineEdit element to true
We need to manage another scenarios in the code, if users tries to make operations with multiple values. In that case we will display an error message in the LineEdit element and reset all the variables to their default values. In order to do so we have do edit the slots of operation buttons as shown in the figure 16.

Figure 16: Manage errors for multiple operators
Now that the application has taken a complete shape we have to manage the last element, equal operator. When the user clicks on the equals button we have to display the result in the LineEdit element and reset the values of variables in order to make the application ready or new operations, but we have to manage some possible wrong input cases from the user. The first case that must be taken in consideration is when the user presses the equals button without pressing the operation button and the second case is there is pressed the operation button but there is pressed no number after the operation button is pressed. We can do the second check by checking the value of the second number or by assigning the value of the boolean variable secondNumberEntered to true in the manage click method and than checking its value when the equals button is pressed as shown in the figure 17.

Figure 17: Equals button slot, manage errors
In the figure 17 is shown the case of addition operation as well. The figure 18 bellow shows all four operations and a control in case of division. Being that we can not divide by 0, if the user tries to give the second number 0 than we will have to print an error message in that case.

Figure 18: Equals button slot, operations and variables reset
In the figure 18 above is shown the reset of variables as well after the result is displayed.
By completing the management of the equals operation we complete the functionalities of the calculator.
(please report broken link in the comment)
First of all we need to create a new project as shown in the lesson 1. During the creation, instead of mainwindow class we have used calculator class.
After creating the project, in design view of qt creator we create the layout of our application. Initially we get a LineEdit element from the toolbox panel as shown in the figure 1.

Figure 1: Add LineEdit on window
After we add the line edit on window we fix the size according to our needs, in this case we fill the window horizontally by leaving some margin right and left. After we add the LineEdit element on window we need to add the buttons for the numbers and operations as well as shown in the figure 2.

Figure 2: Add PushButton on window
After we add the buttons as shown in the figure above we need to change their text. In order to change the text of buttons we double click on them and change the text for every button as shown in the figure 3 bellow.

Figure 3: Change the text of buttons
This will be the final graphical layout that our application will have.
In many calculator sotware the text on the LineEdit element is shown on the right. By default the LineEdit component shows the text on the left. In order to change this property of LineEdit we need to select it and change the value of alignment property from AlignLeft to AlignRight as shown in the figure 4 bellow.

Figure 4: Change the text alignment of LineEdit
After we complete the above steps on the layout we can start working with the code. In order to add event on buttons we need to right-click on them and click on "Go to slot..." menu as shown in the figure 5.

Figure 5: PushButton context menu

Figure 6: Generated slot
The action of slot generation must be repeated for every button on window in order to have generated slots for every button. The Qt Creator generates the definition of slots in the header file calculator.h when it generates their implementations in the source file calculator.cpp. The slots definition in the header file is shown in the figure 7 bellow.

Figure 7: Slot's definitions
After we generate all the functions for the buttons on window we create a function called manageClick which is shown in the figure 8 bellow.

Figure 8: Definition of manageClick function.

Figure 9: Declaration and initialization of variables with default values
After we complete the definition of the variables shown above and have defined the manageClick function we need to proceed with the implementation of manageClick function in the source file calculator.cpp as shown in the figure 10.

Figure 10: Implementation of manageClick function
In the body of this method we will have to add the value of the pressed button the the firstNumber or secondNumber variables and display the new digit on LineEdit together with the other digits pressed before. First of all we need to determine where to append the newly pressed digit. This decision we will take based on the value of the signPressed variable. If this variable has the default value "" that we mentioned above it means that there is not pressed any operation yet from the user, so we will append the new digit to the first variable, otherwise if the signPressed variable has a value assigned it means that we need to append the digits in the secondNumber variable. This logic is expressed in C++ code as shown in the figure 10 above. So as seen from the figure the structure that allows us to take a decision is the if statement. The structure of if statement is as shown bellow:
Example code:
So in our case if the expression signPressed == "" will evaluate to true the code inside the first set of curly brackets will be executed else the code inside the set of the curly brackets will be executed.
As mentioned while explaining the definition of signPressed variable we will assign to it a value when the +,-,* or / button are pressed and at the same time we will have to display this operations on the LineEdit element. In order to be able such thing we need to add in the slots of +,-,* and / buttons the code shown in the figure 11.

Figure 11: Manage operation's button click
In the case of this lesson the buttons of operations are named pushButton_11, pushButton_12, pushButton_13 and pushButton_14. In order to check which are the names of your operation buttons you can click on the button in the design view mode and check the value of objectName property in the properties panel as shown in the figure 12, you can change the name of buttons but you would have to generate again their slots in that case.

Figure 12: objectName property
After we manage the click event on operation buttons we have to manage the clicks on number buttons as well, in order to do so we call the manageClick function on all the slots of number buttons as shown in the figure 13.

Figure 13: Call of manageClick function in every number button slot
We call the manageClick function with the text value of every function as parameter. Until this point we are able to see the entered digits and operations in the LineEdit on window as seen in the figure 14.

Figure 14: Execution example, digits and operation sign shown
There is one more thing to be managed in the graphical part, we do not want that the user to enter directly text on the LineEdit element so we change the LineEdit's property readOnly to true by checking the checkbox as shown in the figure 15.

Figure 15: Set readOnly property of LineEdit element to true
We need to manage another scenarios in the code, if users tries to make operations with multiple values. In that case we will display an error message in the LineEdit element and reset all the variables to their default values. In order to do so we have do edit the slots of operation buttons as shown in the figure 16.

Figure 16: Manage errors for multiple operators
Now that the application has taken a complete shape we have to manage the last element, equal operator. When the user clicks on the equals button we have to display the result in the LineEdit element and reset the values of variables in order to make the application ready or new operations, but we have to manage some possible wrong input cases from the user. The first case that must be taken in consideration is when the user presses the equals button without pressing the operation button and the second case is there is pressed the operation button but there is pressed no number after the operation button is pressed. We can do the second check by checking the value of the second number or by assigning the value of the boolean variable secondNumberEntered to true in the manage click method and than checking its value when the equals button is pressed as shown in the figure 17.

Figure 17: Equals button slot, manage errors
In the figure 17 is shown the case of addition operation as well. The figure 18 bellow shows all four operations and a control in case of division. Being that we can not divide by 0, if the user tries to give the second number 0 than we will have to print an error message in that case.

Figure 18: Equals button slot, operations and variables reset
In the figure 18 above is shown the reset of variables as well after the result is displayed.
By completing the management of the equals operation we complete the functionalities of the calculator.
(please report broken link in the comment)


Comments
Post a Comment