C++ Beginner: Lesson 4 - Tic Tac Toe game
In this lesson we will cover if condition which we saw in the previous lesson as well, and we will cover the switch control statement too. Other elements that we will cover in this lesson are one and two dimensional arrays and we will see the for loop as well.
During this lesson we will develop the tic tac toe game. In order to do so, we need to create a new project as we have seen in lesson 1, but in this case we will call the application TicTacToe and the class will be named TicTacToe as well as shown in the figure 1.
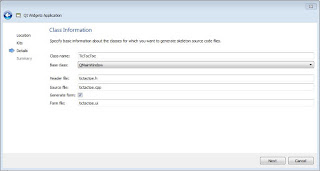
Figure 1: TicTacToe game
The first step to create the TicTacToe application is to prepare the layout of the window. From the toolbox panel we take the Grid Layout element and drag it into window and than select the window and press the Lay Out in a Grid button as shown in the figure 2.

Figure 2: Grid layout
After the setup of the layout we start dragging and dropping into the window 9 QPushButton elements as shown in the figure 3 bellow.

Figure 3: Add buttons
After adding the buttons in the grid as shown in the figure 3 we need to make them squares. In order to do that we need to change the height of the buttons by changing the the value of Vertica Policy property under sizePolicy into Expanding as shown in the figure 4.

Figure 4: Changing button's height
We don't need the view of a button in the tic tac toe field as well so we need to change the flat property from unchecked to checked as shown in the figure 5.
Figure 5: Change flat property of buttons
These actions and the ones following should be done by keeping selected all the 9 buttons as shown in the respective pictures. We need to change the text of the buttons to X or O in order to get the view that they will have during the execution of the application after each change of the value of property that we make. In order to change the text we need to change the text property as shown in the figure 6.

Figure 6: Change the text of the buttons
In order to get a better view of tic tac toe game change the size of the text according to the size of your buttons and window in order to fill the button as shown in the figure 7. In the figure 7 the property Point Size under font is set to 50.

Figure 7: Change the size of text of buttons
Finally after we get the view how the buttons will look like during the execution we remove the text on them by changing the text property again as shown in the figure 8.

Figure 8: Remove text from buttons
We need separating lines between buttons so we add 6 horizontal lines between buttons as shown in the figure 9.

Figure 9: Add horizontal lines
After adding the horizontal lines we need to add 6 vertical lines as well in order to divide the buttons vertically as shown in the figure 10.

Figure 10: Add vertical lines
After we add the horizontal and vertical lines we need to change some properties so we need to select all the lines before trying to change the properties shown in the figure 11 and 12. First of all change the value of Width and Height under the minimumSize to 10 as shown in the figure 11.

Figure 11: Change minimum height and width of lines
After we change the minimum height and width we need to change the width of the lineWidth property to 10 as shown in the figure 12, remember to have ALL the lines selected when you do this two changes as shown in the figure 12.
 Figure 12: Change lineWidth property
In order to complete the graphical user interface we need to add 2 labels where will be shown information for the user while playing the game. The first label will shown the text "Turn:" or "Winner:" and the second label will shown the text "Player 1" or "Player 2" depending on the state of the game. The initial values for this labels must be "Turn:" for the first label and "Player 1" for the second label as shown in the figure 13 bellow.

Figure 13: Add labels
After we complete the graphical part we need to pass to the code. First we need to create the slots for every button in order to get the click event from the users. In order to do so we need to create slots for every button as mentioned in lesson 3, and as shown in the figure 14 and 15 for this project.

Figure 14: Generate slot for buttons
After we right right-click on the button and than click on "Go to slot..." context menu as shown in the figure 14 we must click than in the clicked() signal on Go to slot window as shown in the figure 15.

Go to slot window
The actions shown in the figures 14 and 15 is needed to be repeated for all 9 buttons. After the actions shown in the figure 14 and 15 are completed for all buttons we get in the file tictactoe.cpp a similar view as shown in the figure 16 with slots added for all 9 buttons.

Figure 16: Functions to handle click event on buttons
After completing the steps shown above we need to start to think how to implement the logic of the game. Initially we will add 3 variables clickCounter, clickedButton and modulus. The clickCounter will keep the number of times that a valid click is made, the default value for this variable will be 0 as initialized when declared as shown in the figure 17. The clickedButton is an array of integers which will have 9 values, one for every button, where the number 0 will mean that a button is not pressed, 1 means that the player 1 has pressed the button and 2 means that player 2 has pressed the button. In the figure 17 is shown the declaration and initialization of that variable and a way of declaration and initialization of arrays in general. The last variable, modulus, is not initialized because there is not needed a default value for that variable because it is calculated before use and its default value is never needed as we will see later on.

Figure 17: Declaration of variables
As mentioned above the clickedButton variable will hold a value for each button on window. Figure 18 bellow shows a mapping between the names of the buttons and the indexes of the array which will store the state of that button.

Figure 18: Mapping of buttons whit indexec of clickedButton array index
When a player clicks on a button we need to determine who was the player, if there was player 1 we will need to display the character "X" on that button else, if the player 2 pressed that button we will need to display the character "O" on that button. In order to determine who was the player that pressed the button we will create the playerTurn function where will be implemented the logic to determine the player that pressed the button. This function will get as a parameter the button index in order to update the value in the array which stores the state of the button in the appropriate index. The figure 19 bellow shows the declaration of this method in the tictactoe.h file.

Figure 19: Declaration of playerTurn function
After we declare the playerTurn in the tictactoe.h file we need to implement it in the tictactoe.cpp file as shown in the figure 20.

Figure 20: Implementation of playerTurn function
Like it can be seen from the figure 20, first we need to check if the state of the button which is being clicked is not clicked before, because of the first player has clicked a button the second player can not click again that button and overwrite his sign. So if we got to do with a valid click we increment the value of clickCounter variable, for example if it would have been the first click of the game, as we saw in the variable declaration the default value of clickCounter variable is 0 and when the click happens it would be incremented to 1. After we increment the value of clickCounter variable we check its modulus, the remaining from the division of the value of clickCounter variable by 2, if that remaining would be 1, as it would be in the case of the first click, 1%2=1, because the division of 1/2 is 0 and we have a remaining of 1 which is our modulus. We check the value of modulus in this case through the switch statement. We pass to the switch structure the modulus variable, meaning that we want to check the values of this variables. As we mentioned before, if the value of this variable would be 1 it would mean that the first player has clicked, so we need to update the text of label 2 with the text "Player 1" and update the value of clickedButton array for the index of the clicked button to 1, meaning that player 1 has pressed that button and in the end of this control we have the return 1 statement which means we will exit from the function with value 1 and will not continue further. The returned value will be used in the slot of the clicked button to determine the character which will be displayed on the button. In the case 0 we do the same operations but with the values of player 2. If there will be the case when the player will click on a button already clicked before the function will exit by returning the value 0 because the expression inside if condition shown in the figure 20 above will evaluate to false and none of the statements inside the if condition will not be executed.
After we determine who was the player that had clicked on a button, we need to be able to determine the winner. The figure 21 bellow shows all possible combinations that the player can make to win the game.

Figure 21: All combinations of winning
The logic which will determine if a player will be a winner or not will be implemented in the winner function. The declaration of this function is shown in the figure 22 bellow. In the figure 22 is shown a new variable called winCombinations, it is a 2 dimensional array which will holds the combination indexes of clickedButton array for which a player can be winner.

Figure 22: Declaration of winner function and winCombinations array
The implementation of winner function is shown in the figure 23 bellow. As you can see from the figure in the beginning of the function is declared a boolean variable called winningCombinations which is initialized to true. In this function we will iterate through the 2-dimensional array which holds the indexes of clickedButton for which a player can be winner if the all hold the value of the player. Consider the winningCombinations variable like an array which has 8 arrays with 3 elements inside. In the outer loop, the first one shown in the figure 23, we will iterate through 8 arrays and in the inner loop we will iterate through the elements of each array with 3 elements. If one of the 3 elements of the array is different from the number of the player it means that the combination through which is being iterated is not a winning combination so the boolean variable winningCombinations must be set to false and is exited from that combination to check another one, otherwise if all the 3 values o a given combination are equal to the value of the player than the winningCombinations variable will keep its default value true and when the execution of inner loop will end the if condition that follows will evaluate to true by executing the block of code inside it, which means that the labels will show that the player passed as parameter has won the game and the function will exit returning value true, else if none of the combinations will have in all indexes the value of the player being tested the function will exit returning false.

Figure 23: Implementation of winner function
After we complete the above steps we can call this functions in the slots of the buttons in order to complete the logic of the game. First we need to call the playerTurn function with the index of clickedButton which is mapped with the respective button as explained above. After we get the turn of the player we set the text of the button or that player as shown in the figure 24. In the end we check if that click makes the player winner or not by calling the winner function.

Figure 24: Adding the call toward playerTurn and winner function from slots of the buttons
We need to repeat the operation above for all the slots of the buttons. Finally in order to make more complete the application, when one player has won the game we need to be able to play a new one, so we need a reset functionality which will reset the game to its default state. In order to do so we declare a new function called reset and a new variable called gameOver with default value to false as shown in the figure 25.

Figure 25: Reset function declaration and gameOver variable declaration and initialization
Figure 26 bellow shows the implementation of reset function, how to reset the values of the variables and of the graphical elements.

Figure 26: Implementation of reset function
After creating the reset function we need to call it in the slots of the buttons, but we should not call it immediately after a game is won because it would not give the chance to the users to see the result, this is the reason why when a game is won we set the state of the game in the gameOver variable, which is controlled than in the beginning of the next operation, which will be the first operation of the new game. In order to implement this logic all the slots of the buttons must be edited as shown in the figure 27 bellow.

Figure 27: Implementation of reset functionality in application
Figure 28 shows the created application running.

Figure 28: Running application
(please report broken link in the comment)
During this lesson we will develop the tic tac toe game. In order to do so, we need to create a new project as we have seen in lesson 1, but in this case we will call the application TicTacToe and the class will be named TicTacToe as well as shown in the figure 1.

Figure 1: TicTacToe game
The first step to create the TicTacToe application is to prepare the layout of the window. From the toolbox panel we take the Grid Layout element and drag it into window and than select the window and press the Lay Out in a Grid button as shown in the figure 2.

Figure 2: Grid layout
After the setup of the layout we start dragging and dropping into the window 9 QPushButton elements as shown in the figure 3 bellow.

Figure 3: Add buttons
After adding the buttons in the grid as shown in the figure 3 we need to make them squares. In order to do that we need to change the height of the buttons by changing the the value of Vertica Policy property under sizePolicy into Expanding as shown in the figure 4.

Figure 4: Changing button's height
We don't need the view of a button in the tic tac toe field as well so we need to change the flat property from unchecked to checked as shown in the figure 5.

Figure 5: Change flat property of buttons

Figure 6: Change the text of the buttons
In order to get a better view of tic tac toe game change the size of the text according to the size of your buttons and window in order to fill the button as shown in the figure 7. In the figure 7 the property Point Size under font is set to 50.

Figure 7: Change the size of text of buttons
Finally after we get the view how the buttons will look like during the execution we remove the text on them by changing the text property again as shown in the figure 8.

Figure 8: Remove text from buttons
We need separating lines between buttons so we add 6 horizontal lines between buttons as shown in the figure 9.

Figure 9: Add horizontal lines
After adding the horizontal lines we need to add 6 vertical lines as well in order to divide the buttons vertically as shown in the figure 10.

Figure 10: Add vertical lines
After we add the horizontal and vertical lines we need to change some properties so we need to select all the lines before trying to change the properties shown in the figure 11 and 12. First of all change the value of Width and Height under the minimumSize to 10 as shown in the figure 11.

Figure 11: Change minimum height and width of lines
After we change the minimum height and width we need to change the width of the lineWidth property to 10 as shown in the figure 12, remember to have ALL the lines selected when you do this two changes as shown in the figure 12.
 Figure 12: Change lineWidth property
In order to complete the graphical user interface we need to add 2 labels where will be shown information for the user while playing the game. The first label will shown the text "Turn:" or "Winner:" and the second label will shown the text "Player 1" or "Player 2" depending on the state of the game. The initial values for this labels must be "Turn:" for the first label and "Player 1" for the second label as shown in the figure 13 bellow.

Figure 13: Add labels
After we complete the graphical part we need to pass to the code. First we need to create the slots for every button in order to get the click event from the users. In order to do so we need to create slots for every button as mentioned in lesson 3, and as shown in the figure 14 and 15 for this project.

Figure 14: Generate slot for buttons
After we right right-click on the button and than click on "Go to slot..." context menu as shown in the figure 14 we must click than in the clicked() signal on Go to slot window as shown in the figure 15.

Go to slot window
The actions shown in the figures 14 and 15 is needed to be repeated for all 9 buttons. After the actions shown in the figure 14 and 15 are completed for all buttons we get in the file tictactoe.cpp a similar view as shown in the figure 16 with slots added for all 9 buttons.

Figure 16: Functions to handle click event on buttons
After completing the steps shown above we need to start to think how to implement the logic of the game. Initially we will add 3 variables clickCounter, clickedButton and modulus. The clickCounter will keep the number of times that a valid click is made, the default value for this variable will be 0 as initialized when declared as shown in the figure 17. The clickedButton is an array of integers which will have 9 values, one for every button, where the number 0 will mean that a button is not pressed, 1 means that the player 1 has pressed the button and 2 means that player 2 has pressed the button. In the figure 17 is shown the declaration and initialization of that variable and a way of declaration and initialization of arrays in general. The last variable, modulus, is not initialized because there is not needed a default value for that variable because it is calculated before use and its default value is never needed as we will see later on.

Figure 17: Declaration of variables
As mentioned above the clickedButton variable will hold a value for each button on window. Figure 18 bellow shows a mapping between the names of the buttons and the indexes of the array which will store the state of that button.

Figure 18: Mapping of buttons whit indexec of clickedButton array index
When a player clicks on a button we need to determine who was the player, if there was player 1 we will need to display the character "X" on that button else, if the player 2 pressed that button we will need to display the character "O" on that button. In order to determine who was the player that pressed the button we will create the playerTurn function where will be implemented the logic to determine the player that pressed the button. This function will get as a parameter the button index in order to update the value in the array which stores the state of the button in the appropriate index. The figure 19 bellow shows the declaration of this method in the tictactoe.h file.

Figure 19: Declaration of playerTurn function
After we declare the playerTurn in the tictactoe.h file we need to implement it in the tictactoe.cpp file as shown in the figure 20.

Figure 20: Implementation of playerTurn function
Like it can be seen from the figure 20, first we need to check if the state of the button which is being clicked is not clicked before, because of the first player has clicked a button the second player can not click again that button and overwrite his sign. So if we got to do with a valid click we increment the value of clickCounter variable, for example if it would have been the first click of the game, as we saw in the variable declaration the default value of clickCounter variable is 0 and when the click happens it would be incremented to 1. After we increment the value of clickCounter variable we check its modulus, the remaining from the division of the value of clickCounter variable by 2, if that remaining would be 1, as it would be in the case of the first click, 1%2=1, because the division of 1/2 is 0 and we have a remaining of 1 which is our modulus. We check the value of modulus in this case through the switch statement. We pass to the switch structure the modulus variable, meaning that we want to check the values of this variables. As we mentioned before, if the value of this variable would be 1 it would mean that the first player has clicked, so we need to update the text of label 2 with the text "Player 1" and update the value of clickedButton array for the index of the clicked button to 1, meaning that player 1 has pressed that button and in the end of this control we have the return 1 statement which means we will exit from the function with value 1 and will not continue further. The returned value will be used in the slot of the clicked button to determine the character which will be displayed on the button. In the case 0 we do the same operations but with the values of player 2. If there will be the case when the player will click on a button already clicked before the function will exit by returning the value 0 because the expression inside if condition shown in the figure 20 above will evaluate to false and none of the statements inside the if condition will not be executed.
After we determine who was the player that had clicked on a button, we need to be able to determine the winner. The figure 21 bellow shows all possible combinations that the player can make to win the game.

Figure 21: All combinations of winning
The logic which will determine if a player will be a winner or not will be implemented in the winner function. The declaration of this function is shown in the figure 22 bellow. In the figure 22 is shown a new variable called winCombinations, it is a 2 dimensional array which will holds the combination indexes of clickedButton array for which a player can be winner.

Figure 22: Declaration of winner function and winCombinations array
The implementation of winner function is shown in the figure 23 bellow. As you can see from the figure in the beginning of the function is declared a boolean variable called winningCombinations which is initialized to true. In this function we will iterate through the 2-dimensional array which holds the indexes of clickedButton for which a player can be winner if the all hold the value of the player. Consider the winningCombinations variable like an array which has 8 arrays with 3 elements inside. In the outer loop, the first one shown in the figure 23, we will iterate through 8 arrays and in the inner loop we will iterate through the elements of each array with 3 elements. If one of the 3 elements of the array is different from the number of the player it means that the combination through which is being iterated is not a winning combination so the boolean variable winningCombinations must be set to false and is exited from that combination to check another one, otherwise if all the 3 values o a given combination are equal to the value of the player than the winningCombinations variable will keep its default value true and when the execution of inner loop will end the if condition that follows will evaluate to true by executing the block of code inside it, which means that the labels will show that the player passed as parameter has won the game and the function will exit returning value true, else if none of the combinations will have in all indexes the value of the player being tested the function will exit returning false.

Figure 23: Implementation of winner function
After we complete the above steps we can call this functions in the slots of the buttons in order to complete the logic of the game. First we need to call the playerTurn function with the index of clickedButton which is mapped with the respective button as explained above. After we get the turn of the player we set the text of the button or that player as shown in the figure 24. In the end we check if that click makes the player winner or not by calling the winner function.

Figure 24: Adding the call toward playerTurn and winner function from slots of the buttons
We need to repeat the operation above for all the slots of the buttons. Finally in order to make more complete the application, when one player has won the game we need to be able to play a new one, so we need a reset functionality which will reset the game to its default state. In order to do so we declare a new function called reset and a new variable called gameOver with default value to false as shown in the figure 25.

Figure 25: Reset function declaration and gameOver variable declaration and initialization
Figure 26 bellow shows the implementation of reset function, how to reset the values of the variables and of the graphical elements.
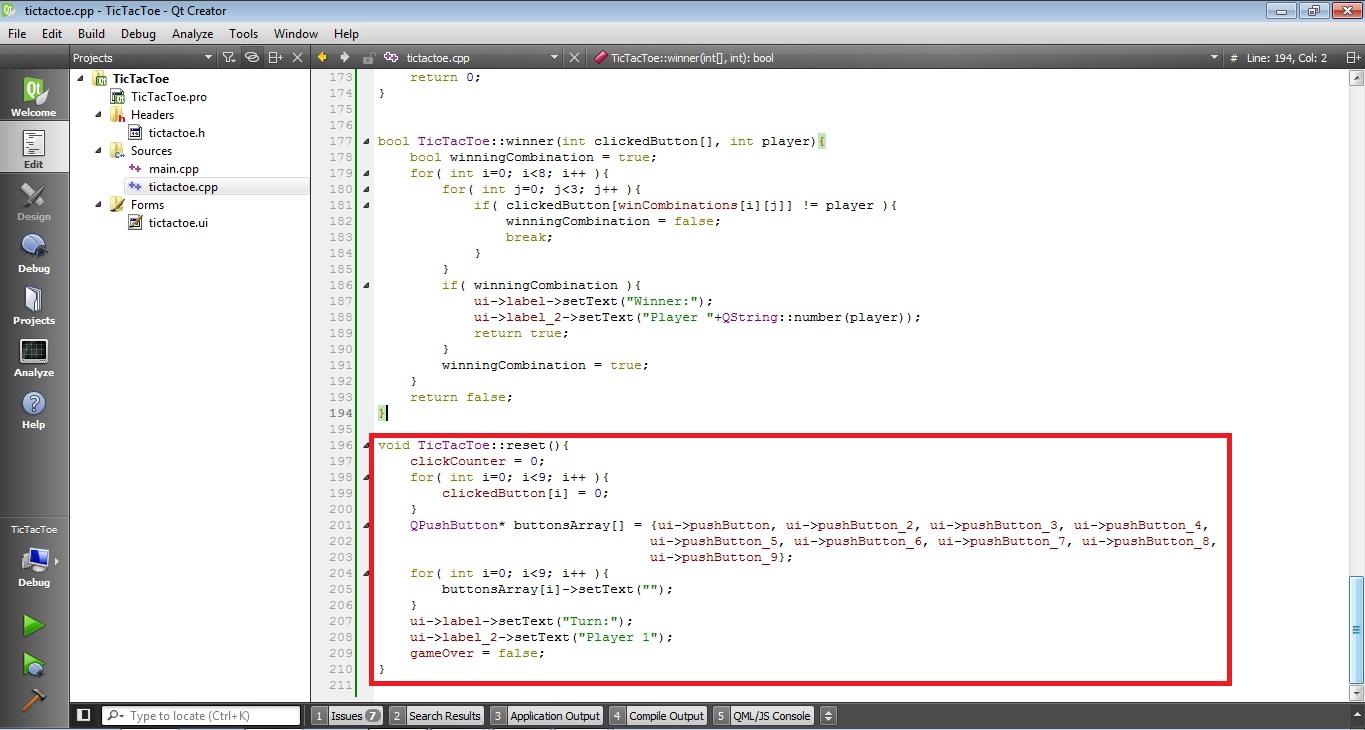
Figure 26: Implementation of reset function
After creating the reset function we need to call it in the slots of the buttons, but we should not call it immediately after a game is won because it would not give the chance to the users to see the result, this is the reason why when a game is won we set the state of the game in the gameOver variable, which is controlled than in the beginning of the next operation, which will be the first operation of the new game. In order to implement this logic all the slots of the buttons must be edited as shown in the figure 27 bellow.

Figure 27: Implementation of reset functionality in application
Figure 28 shows the created application running.

Figure 28: Running application
(please report broken link in the comment)
Comments
Post a Comment