Online MySQL database
In order to build complete and fully functional applications sometimes we need databases to store and manipulate data, but we do not need to access them only from the LAN but even through the internet. In order to have an online database there are several ways like exposing a locally owned server to the internet or if you own a web host account they usually come with MySQL database which you can use for other purposes as well except storing the data of the website. Except this two ways there are some free online MySQL database providers as well. This is the what we will cover in this lesson, how to have a MySQL database online for free. This kind of database that we will see in this lesson are for experiments only because they are not reliable and they are slow.
We will use the online database in upcoming lessons so we need to have one ready for those lessons. In order to have this free online database we need to go to db4free.net. After you go to the link mentioned previously, in the home page you can click on the link shown in the figure 1, or you can click on the Database menu and than select Signup on the left panel as shown in the figure 1 as well or you can go directly to signup.
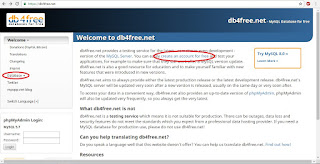
Figure 1: db4free.net homepage
After you reach the signup page as shown in the figure 2, you need to provide the required information respecting the constrains shown on each input box. In the figure 2 is shown an example.

Figure 2: Sign up process
The database name and user name shown in the figure will not be possible to be used by you because they are unique for all users of db4free.net so you have to try other information for those fields. You have to try different names until you get the message shown in the figure 3.

Figure 3: Successful signup
It may take a while for the until the confirmation emails comes but if you have inserted the right email during the signup it will come. After you get the confirmation email, you must click in the link similar to the one shown in the figure 4 in order to activate your database.

Figure 4: Confirmation email
After clicking the link in the confirmation email you should see the page shown in the figure 5 with the summery of your account information. You should not forget your username and the password that you entered during the signup process, because you will need them to log into the database.

Figure 5: Confirmation page
In almost all the pages there is the login panel on the left as shown in the figure 6.
 Figure 6: Login form
After you provide the username and the password of your account you should be able to be logged into the database. It may take a while because as I mentioned before it is a testing environment which is not very fast. The figure 7 shows the panel of phpMyAdmin after login.

Figure 7: phpMyAdmin panel
In the upcoming lessons we will see how to read, write and update data in the database from the applications that we will program.
(please report broken link in the comment)


Comments
Post a Comment