Exercise Intermediate, part 2: Chat application - Complete DatabaseInteraction
This part is a continuation of Exercise Intermediate, part 1: Chat application - Establish connection so before starting this part of the exercise make sure to have completed the part 1 first.
In order to complete the DatabaseInteraction class we need first to determine the tables that we must create on the database. In a chat room we need to know the peoples that a writing and the conversations they are making. As many problems have many solution, our problem has many solutions as well. We can determine to create a table for every user that is registered to our database where we can store the chats of every user or we can create a table chat and a table users which would be more acceptable if we would have in mind the normalization rules.
For the table users, we would need a column username which would be our primary key because they must be unique, we would need a field password as well, we can add fields name and surname as well but this are not mandatory fields. In the table chat we would need to have a column for the sender, one for the receiver, one for the message and one column, read, which would show us if the message is read or not.
In order to create the tables we need to login in the phpMyAdmin panel. In order to do so we need to go to db4free.net and login into the database that we created during the Online MySQL database lesson.
In order to create the tables, after being logged into the database, you need to click the name of the database and in the window that shows next enter the name of the table and the number of columns as shown in the figure 1 bellow.
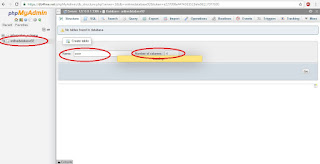
Figure 1: Create table on DB
As we mentioned previously the will have 4 columns, username, password, name and surname. The column username will be unique and primary key of the user table and it will be of type varchar(50) which means that we will accept usernames with at most 50 characters. The password will be varchar(50) as well, we will not use encrypted passwords in this lesson in order not to lose focus from the communication between the application and database. The other 2 columns we will make them varchar(30) which is probably enough. In the figure 2 bellow is shown the creation of the user table.

Figure 2: Create user table
Table chat will have 4 columns as well, the first column sender, being that will store the username of a user should be of the same type as the column username of user table, varchar(50), the same rule is for the column receiver as well, so this column will be of type varchar(50) too. The column message will not have limits on its length so we will make it of type text. The last column, read, will be of type char(1) and this column will get value 1 if the message is read and value 0 if the message is not read. This information inserted in the database during the creation of the table is shown in the figure 3.

Figure 3: Create chat table
Now that we have both the tables that we need in our database let's get back to the DatabaseInteraction class. First of all we will need a method which will write in our database when the user registers in our application and when the user writes a message. So when the user registers to the database we will need to add its records to the user table and for this we will create the method addUser. We will create the class User as well in our project, we will map the fields of this class with the columns of user table. User class will have the attributes shown in the figure 4.

Figure 4: Attributes of User class
As it can be seen from the picture above the attributes of the User class match with the columns of user table in database. You can see as well from the picture that the attributes are private, which means that they can be accessed only within the class or subclass in case this class is extended, but we do not want to access them just from this class or a subclass and for this reason we need to generate the setters and getters as shown in the figure 5.

Figure 5: Insert code...
In order to generate automatically the setters and getters we need to right click within the class and select Insert Code... as shown in the figure 5 and in the next menu that shows we select Getter and Setter... as shown in the figure 6.

Figure 6: Getter and Setter...
In the end in order to generate the getter and setter we select all the fields like shown in the figure 7 and click the Generate button.

Figure 7: Generate setter and getter
This action completes the User class. Now we get back to the addUser method of DatabaseInteraction class. The add User will get as parameter a User object and that will pass the parameters of this user to the database.

Figure 8: addUser function
After we complete the addUser unction which we will use when a user will sign up into our application, we must add another function, getUserByUsername which we will need to use when a user signs into our application. The getUserByUsername will get a string parameter username and will return a User object. The getUserByUsername function is shown in the figure 9 bellow.
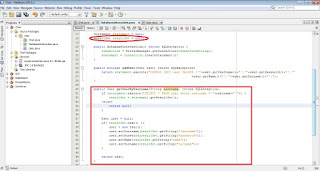
Figure 9: getUserByUsername function
As you can see from the figure above we declare a variable resultSet of type ResultSet in order to be able to declare that kind of variable we need to add the following import to our code.
Example code:
ResultSet is what is returned from the getResultSet function of Statement class when we pass to the execute function of the same class a select query as parameter on it. The execute statement returns a boolean value after it is executed and that is why we put it in a if statement. The the returned value is true it means that the execution of execute function was successful so we can get the result set out of the statement object else the getUserByUsername function will return null which means that the execution was not successful and we will check this value when we call getUserByUsername unction at Chat class. If we have a valid execution of execute function we proceed with the declaration of a user variable of type User which we initialize it with null because we will return null if the query has returned no value for the given username not an initialized object. We will return an initialized object user only if we have data returned from the getResultSet function. In that case we initialize the user variable by calling its default constructor which is the only constructor it has in our case and than we set its properties with the values returned rom the getResultSet function as shown in the figure 9 above and in the end we return the user variable.
When I was making a test as shown in figure 10 to ensure that I had properly coded the getUserByUsername function I found out that I had misspelled the password column when I had created the user table.

Figure 10: Test of getUserByUsername function
That is why I will change the line 41 of code in figure 10 from:
Example code:
to:
Example code:
Maybe this mistake of mine will help you understand the difference between the attributes of User class and the attributes of user table which maybe I did not emphasize enough.
This are the action we need to do with the user for our chat application. Now we pass to the management of conversations. First lets write the function writeMessage. For the messages we will create a class Message as well. We need to add a column to the chat table because for the moment we do not have a primary key there and we do not have a way to identify in a unique way a specific message which we will need to have as a functionality in our code. In order to do so we must get back to the db4free.net and login with our account at phpMyAdmin panel and than expand our database on the left and click on the chat table that we created previously and follow the steps shown in figure 11.

Figure 11: Add column on chat table
In the next window that shows we must populate the data of the new column. As seen from the figure 12 bellow its name will be id, it will be an int column and it will be the primary key. Another attribute of this column that we have not seen previously during this lesson is that it will be auto increment and that can be done by checking the A_I column as shown in the figure bellow. After we complete setting the characteristics of the new column we click on the save button to add it.

Figure 12: Add the id column on chat table
Now we can get back to our writeMessage function. As I mentioned previously let's create the Message class first. For the Message class we follow the same steps as we did with the User class but just change the attributes of the class. In the end we will get the result shown in the figure 13 bellow.

Figure 13: Message class
The writeMessage function will get as parameter a Message object and will return a boolean value. It will return true if the message will be inserted successfully into the database otherwise it will return false. The figure 14 shows the writeMessage function.

Figure 14: writeMessage function
After we have written the function which writes the messages into the database, we need another function which will read the messages from the database, but updates the read flag of the messages which are being read. As you can see from the picture bellow the function loadAllMessagesForUser returns a list of Message objects and gets as parameter the username of the user that has been logged into the application and for whom we need to retrieve the messages, being those the ones that the user has sent even those that has received. This is why we put the following condition at the select query:
Example code:
The above condition means that if we find the name of the logged user as receiver OR as a sender we need to retrieve that record. After we read the records from the database we need to execute an insert statement on the chat table to update the status of the records that we just read. The loadAllMessagesForUser function is shown in the figure 15 bellow.

Figure 15: loadAllMessagesForUser function
In order to make this function work we need to import to following List classes which we have used in this function:
Example code:
Last at the DatabaseInteraction class we need a function that will read the new messages in a conversation. This function will be the loadAllUnreadMessagesForUser function which is shown in the figure 16 bellow.

Figure 16: loadAllUnreadMessagesForUser function
This function has a similar structure with the loadAllMessagesForUser function, but in this case, being that we are in a ongoing conversation, we do not need to read all the messages of the user, but only the messages of the active conversation. To do so we specify in the if condition that we need to read the records for the specific sender and receiver with status unread.
With this function we complete the DatabaseInteraction class. We will continue this application in the next parts.
(please report broken link in the comment)


Comments
Post a Comment